Still have questions?
Shockbyte
Support Team

How to Install a Custom Modpack on Your Minecraft Server
#Introduction
Custom modpacks are collections of mods that are handpicked and put together by players. Unlike most public modpacks, these don’t come with a pre-made server pack, which makes them more challenging to set up.
Because of this, we recommend that only technically advanced users attempt to install custom modpacks, especially if the pack contains a large number of mods. This process can be very time-consuming when working with hundreds of mods.
If you’d rather not go through this process yourself, our team can install the modpack for you with the Server Management Addon.
Important
As an alternative to using a custom modpack, you can use our Modpack Installer, which has hundreds of pre-made modpacks available for easy installation. Check our guide on it here.
#Part 1: How to get started
- Make sure that your custom modpack works in a singleplayer world.
If the modpack doesn’t load properly in singleplayer, it won’t work on your server. Make sure to fix any crashes or mod conflicts before moving forward.
- Check if your server has enough RAM to run the modpack.
You can see our RAM recommendations here. You can see our guide on how to upgrade your server here.
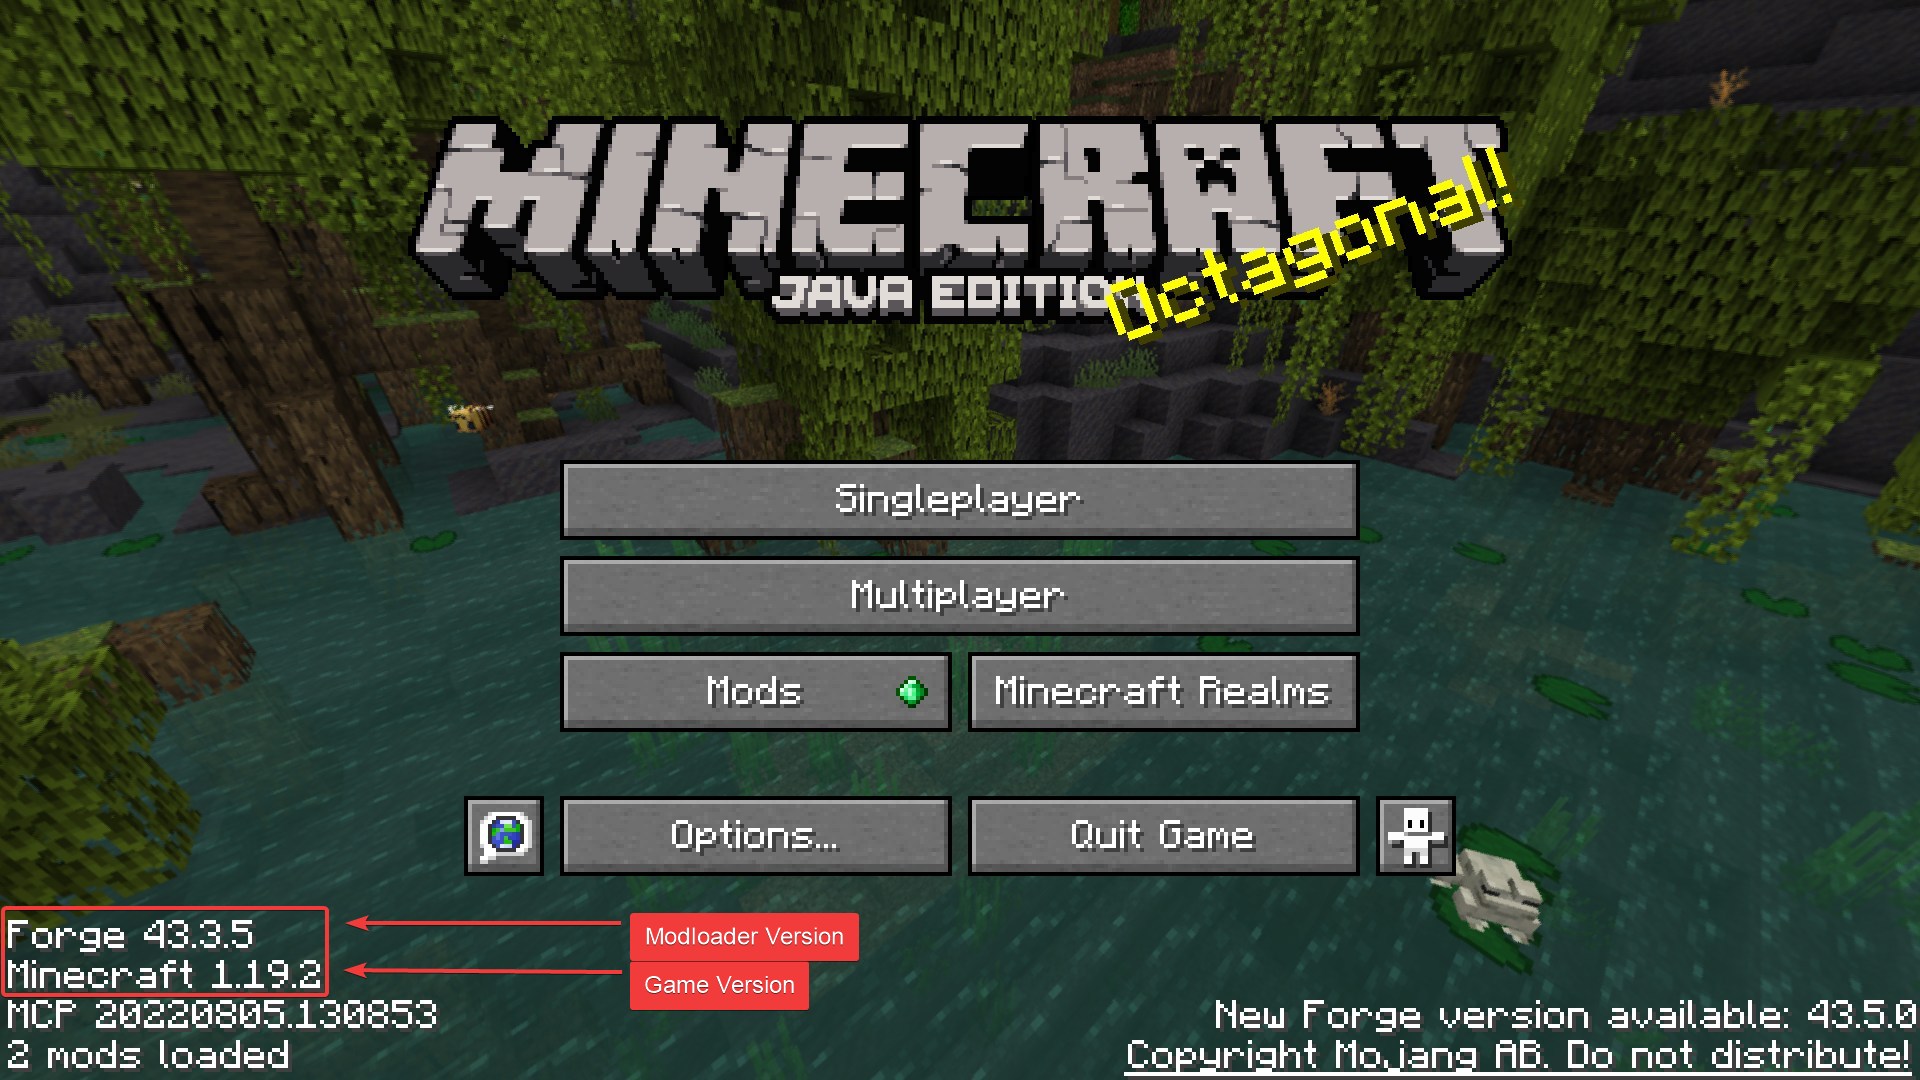
- Verify the modloader version that your modpack is using.
You can see which game and modloader version your modpack is using by viewing the Minecraft title screen. For example: Minecraft 1.19.2 - Forge 43.3.5. Take note of the exact version for Part 2 of this guide.
#Part 2: Getting your server ready
-
Open your server control panel.
-
Shut down the server completely.
It's important for the server to remain offline throughout this process unless you are instructed otherwise.
- Delete all of the files on the server.
If there are any files you wish to keep, you can take a backup first to save them for later. See our guide on this here.
Note: Make sure to delete every file. Any important files will either be reuploaded with the modpack or will be regenerated by the server in later steps of this guide.

- Select the correct modloader version on your server.
Select the game and modloader version you noted earlier and apply it as the server type. You can check our guide on this here.
- If you are using Forge, the 'Recommended' branch will select the latest available version. The 'Experimental' branch allows you to select older versions.
- It is important to match your server's modloader version to the exact version used by your modpack. Choosing a different version can cause your server to crash or prevent you from joining.
Unavailable modloader version
If your modloader version is not available in the control panel, you can upload it as a custom JAR instead. You can check our guide on this here.
#Part 3: Installing the modpack files on your server
- Close your game completely.
Make sure that your game is fully closed and is not running in the background. This will prevent errors during the next steps.
- Locate the modpack folder on your computer.
The location of the modpack folder will vary depending on the method that was used to install the modpack. See our guide on how to find your modpack folder here.
Note: Your modpack folder should contain all of the modpack files, including the mods folder. Double-check that the mods folder contains files inside of it. The files inside will be .jar files.
- If you’ve never launched the modpack, then the "mods" folder may not exist yet. Launch it once in singleplayer so the mods folder is generated, then refresh your file browser.
- If the "mods" folder still isn't present, then the needed modpack files likely aren't in the location that you're viewing.
- Compress the modpack files into a single zip folder.
Compressing the files is not required, but we strongly recommend it. This helps prevent file corruption, reduces the chance of upload errors, and makes the upload speed much faster in the next steps.
- Connect to your server with FileZilla.
Using an SFTP client like FileZilla is strongly recommended. It manages large uploads much faster than your browser. Check our guide on how to connect to your server with FileZilla here.
- Upload the zip to your server using FileZilla.
- Once it is done uploading, unzip the folder in the control panel.
Note: You may need to refresh the file manager for the zip folder to appear after it has been uploaded. In the control panel, click the refresh symbol next to the "SFTP Connect" button.
- Move all of the files inside the unzipped folder into the base directory.
The modpack folders and files must be moved into the base directory in order for them to be recognized by the server.
After moving them to the base directory (/), you can confirm they were moved by clicking "Home" in the File Manager. All of the modpack folders and files should be present there.
#Part 4: Disabling any client-side only mods on your server
After uploading the modpack files to the server, the next step is to disable any client-side only mods inside the server's /mods folder to prevent crashes.
- Understanding client-side only mods
Client-side only mods change how Minecraft works on your own computer, and any changes they make are only visible to you — not other players. They do not modify the server’s mechanics. This means they only need to be installed on your computer. Installing them on the server often causes it to crash because these mods aren’t built to run server-side.
An example of this is the "Zoomify" mod, which lets you zoom your camera using a keybind. Since it only modifies the behavior in your own game, it should stay enabled on your computer, but be disabled on your server.
- How to disable client-side only mods
You can disable a client-side only mod by renaming it in the control panel and adding the text .disabled at the end of the file name.
This fully disables the mod, while still keeping the file present in case you disabled the wrong mod and need to re-enable it later. You can re-enable the mod by removing the text .disabled from the file name.
Example: The mod named entityculling-forge-1.7.4-mc1.20.1.jar would be renamed to entityculling-forge-1.7.4-mc1.20.1.jar.disabled to disable it.
- How to identify client-side only mods
There is no single way to confirm if a mod is client-side only, but mod authors usually provide a way to identify them using one of the methods listed below:
Dependencies
Avoid disabling mods listed as libraries, cores, APIs, or compatibility mods. These are almost always required server-side.
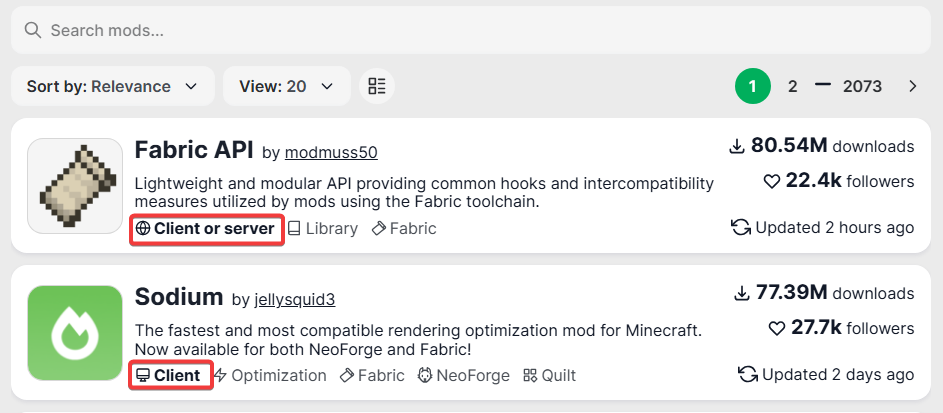
- Method 1 - Modrinth: If a mod is available on Modrinth, the author will indicate whether it is client-side only or offers server-side support. In the following example:
- The Fabric API mod has server-side support and can remain enabled on the server.
- The Sodium mod is listed as client-side only and should be disabled on the server.
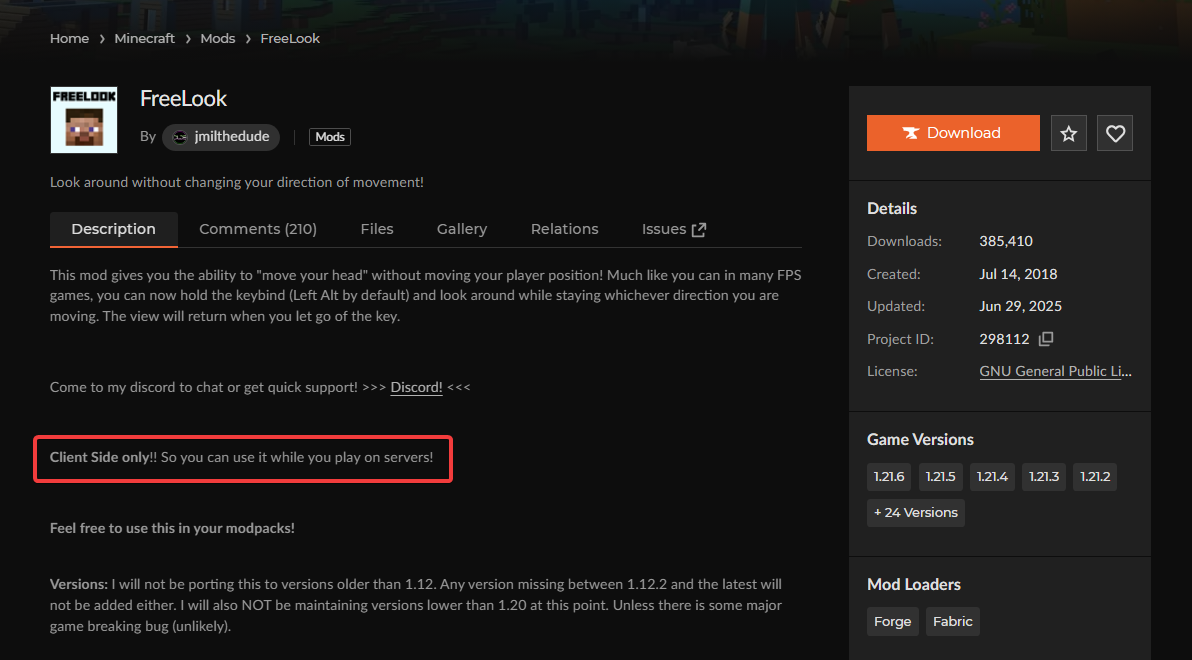
- Method 2 - Mod Description: Authors sometimes specify in the mod description on CurseForge, Modrinth, or other platforms, whether the mod is supported server-side or if it's client-side only. For example, the FreeLook mod author specifies that the mod is client-side only in the description of the CurseForge page.
- Method 3 - Mod Function: You can often tell if a mod is client-side only by observing what it does. If a mod adds new items, blocks, or mobs to the game, or adds a new biome, then it is server-side. If a mod only changes things you see or experience on your own screen, like visual effects, camera zoom, or interface changes, then it is client-side only. For example, you can use client-side only mods on any multiplayer server, and it won't affect other players.
Note: If you have trouble finding where a mod originated from, you can copy the full name of the mod and search it in quotes in your browser. For example, searching "freelook-fabric-1.21-1.6.0.jar" (with the quotes) should bring up results that include the file name of the mod, which is often posted by the original author.
#Part 5: Starting the server and resolving any remaining errors
After disabling the client-side only mods in part 4 of this guide, you can start your server. If everything was set up correctly, the server will go online, and the modpack will work when you join. You can skip to part 6 of this guide if the modpack is working.
However, your server may crash with various errors if issues are still present in the modpack. This section will go over the three most common errors that you may come across.
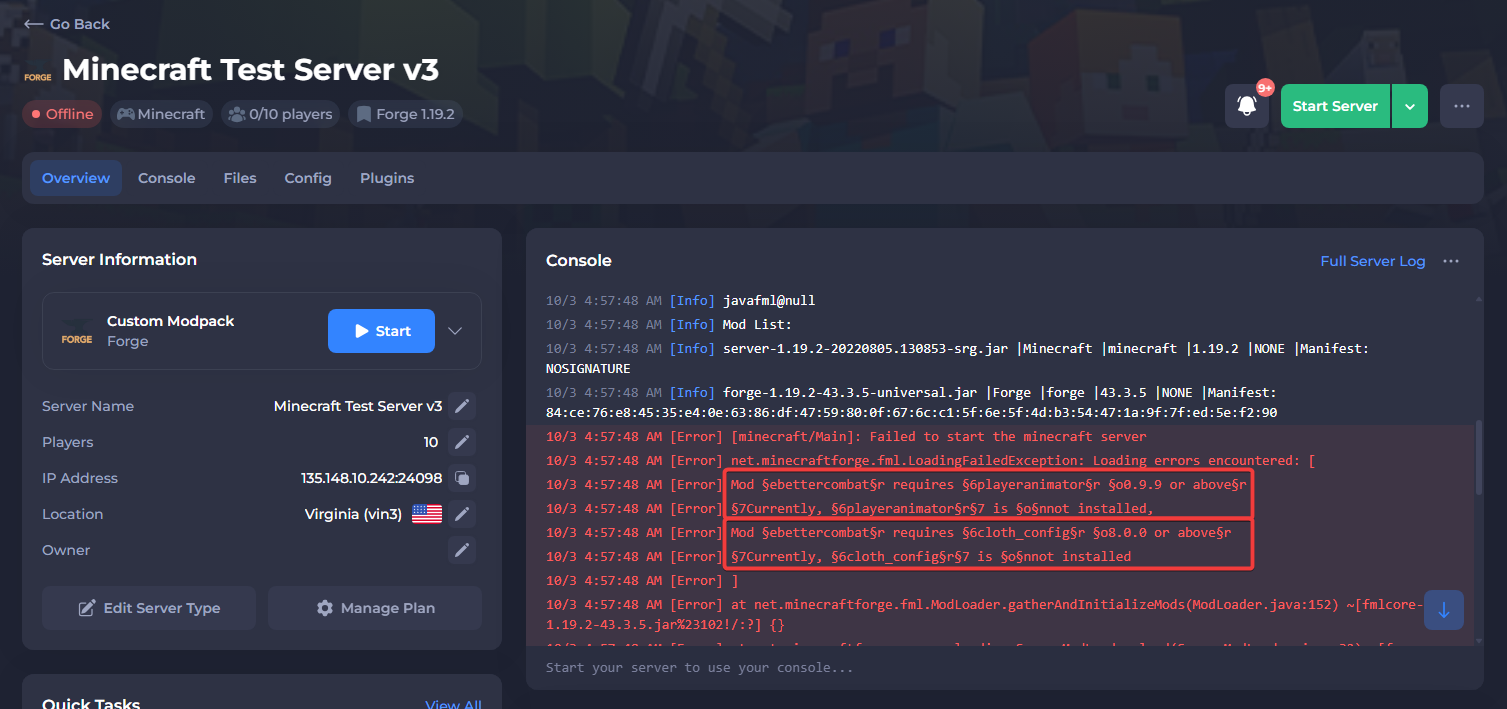
Error 1 - Missing dependencies:
Many mods require one or more dependencies in order to work properly. Dependencies are mods that are libraries, cores, APIs, or compatibility mods. If a required dependency is missing, the server will crash.
As seen in the example below, the server has crashed because the "Better Combat" mod is missing the following dependencies: Player Animator and Cloth Config. You can resolve this by either installing the dependencies, within the version range specified in the console, or by removing the "Better Combat" mod entirely.
You can install the required dependencies by downloading them from the mod page and placing them in the server’s /mods folder just like any other mod.
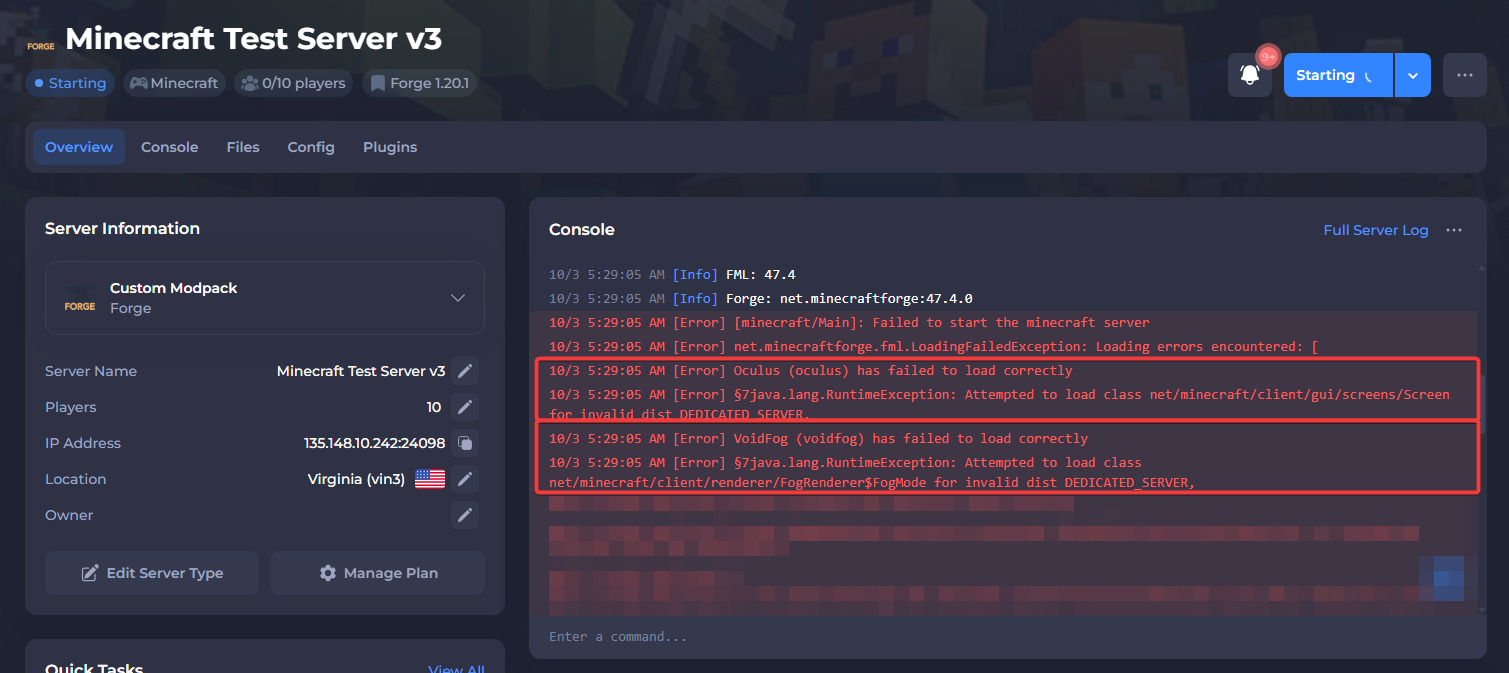
Error 2 - Client-side only mods still left on the server:
In the following example, the server crashed because the mods "Oculus" and "VoidFog" failed to load with the following error: Mod (Modname) has failed to load correctly
This error will specify which mod is causing the crash. Directly below it, you can also see the following error: java.lang.RuntimeException: Attempted to load class net/minecraft/client/gui/screens/Screen for invalid dist DEDICATED_SERVER
This confirms that these mods failed to load because they are client-side only mods. To resolve the issue, you can disable these mods on your server. The mods can stay enabled on your computer.
Error 3 - Mod (modname) has failed to load correctly:
In the previous example, the message below the error Mod (Modname) has failed to load correctly indicates that the mods were client-side only which caused the crash.
However, sometimes you will only see the original error ("Mod has failed to load correctly") with no decipherable messages beneath it. In these cases, the reason the mod is failing to load is more difficult to determine. If the server generated a crash report, it might include a more specific reason.
General Troubleshooting:
- Download and reinstall the mod again to rule out any issues with the file.
- Make sure the mod was created for the correct version (the server version).
- Try a different version of the mod, preferably the latest version of the mod (which still matches the server version).
- Mods can sometimes fail to load due to an issue with the mod itself, which has not yet been resolved by the author. As a last resort, you can remove the mod and find a similar mod to replace it with. Replace the mod on your client as well to prevent a mismatch when joining.
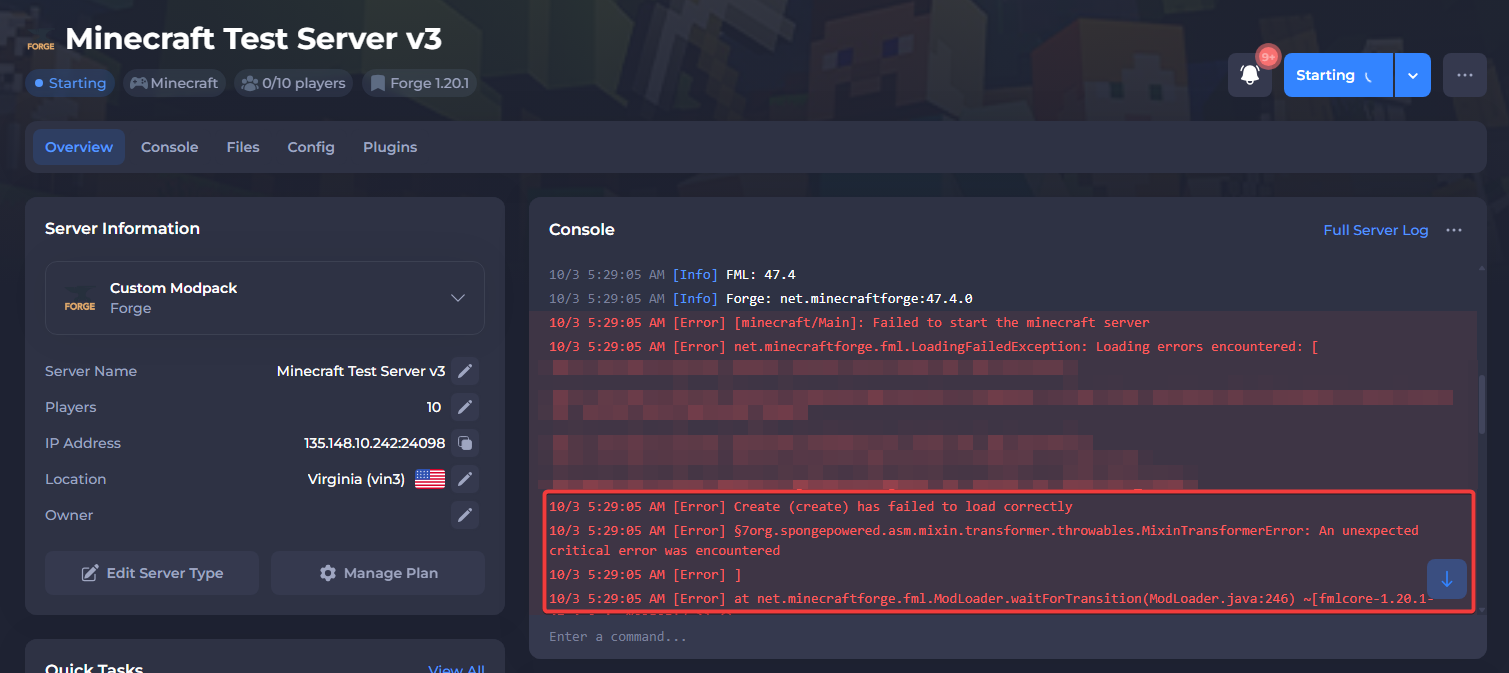
Compatibility Issues:
Mods can also fail to load because of a compatibility issue — most commonly with another mod. Check for common compatibility issues noted by the mod author, usually on GitHub under known issues, in the mod description, in the author's Discord, or other official sources.
For example, in the screenshot below, the "Create" mod is failing to load. This is because the Create mod is incompatible with some of the extra Create add-on mods. Installing the "Create: Add-on Compatibility" mod resolves the issue.
Other errors
Note that this article is not an exhaustive list and you may experience other errors not listed here. If you are unable to determine the cause of a crash, please feel free to reach out to our support team for further guidance.
#Part 6: Making additional configurations
Once your server is online with your modpack, most mods should work right away without any extra setup. However, a few mods may require additional configuration to function properly, particularly those that need access to external services. For example, some mods may require an API key, token, extra port, or database connection to work correctly. Some examples include:
- Simple Voice Chat.
- Biomes O’ Plenty (only if using Forge versions 1.12 and below).
- GeyserMC.
- Mods that require databases.
- Mods that require a token like DiscordSRV.
Keep in mind that this is not a complete list. A mod may require additional setup if the author has noted it on the mod page, if errors show up in the console specifying that additional setup is required, or if the mod does not work as expected in-game.
That’s it, you’re all set! If you run into any issues with your custom modpack or have any questions, please contact our support at: https://shockbyte.com/billing/submitticket.php