We have a video tutorial on installing an entire BungeeCord network in under 60 seconds:
A BungeeCord network is a group of at least three (3) servers, usually with a hub/lobby and at least one gamemode (Survival, Creative, Skyblock, Minigames, etc.) server, all connected by a BungeeCord proxy server. You can find a quick-start introduction to BungeeCord here: Introduction to BungeeCord: How BungeeCord Works
Here at Shockbyte you can get your very own BungeeCord network all set up and running in as fast as 60 seconds!
For the purpose of this tutorial, we will have the following servers and their respective IPs:
- BungeeCord Proxy -
192.168.1.1:25565 - Hub/Lobby -
192.168.2.2:25595 - Skyblock (gamemode) -
192.168.3.3:25583
Part 1: Setting Up the BungeeCord Proxy Server
- On the Multicraft panel (https://mc.shockbyte.com) of your BungeeCord Proxy server, set the Server Type to your preferred version of BungeeCord.

- Start your server to generate the BungeeCord server files.
- On the left sidebar, navigate to Files > Config Files.
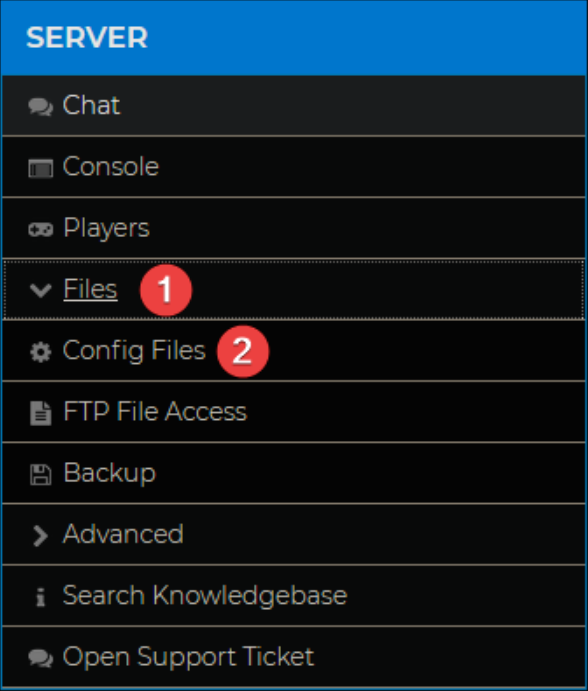
- On the Config Files page, click on the BungeeCord Config file.

- Locate the servers section of the config file and add the each server (hub/lobby and skyblock) of your BungeeCord network along with their respective IP addresses as the Address. Filling out the motd is optional. Do not include the BungeeCord proxy server.

- Click Save to save all changes.
Part 2: Setting Up the Hub and Gamemode (Skyblock) Servers
In this part of the tutorial, the following steps should be done for all your other servers - Hub/Lobby and Gamemode (Skyblock). Repeat the steps below for each additional server you have on your network.
- On the Multicraft panel (https://mc.shockbyte.com) of your Hub and Skyblock server, set the Server Type to your preferred version of PaperSpigot.

- Start the server for all files to be generated. Once your server is fully loaded, stop your server files before proceeding further to ensure that changes are correctly saved.
- Once the server is stopped, on the left sidebar of the panel, navigate to Files > Setup.

- On the Template option of the Setup page, select Configure Spigot for BungeeCord (Auto Config + IP Security). Then, click Apply.

Part 3: Completing the Setup & Connecting to Your Network
Once you've completed setting up your BungeeCord Proxy server (Part 1) and all the other servers on your network (Part 2), restart ALL your servers (BungeeCord proxy, Hub/Lobby and Skyblock) for the changes and settings to take effect.
Once all servers are online, you now have successfully setup your very own BungeeCord network!
You can now join your network by logging in using the server address of your BungeeCord Proxy server.
Related Articles:
If you require any further assistance, please contact our support at: https://shockbyte.com/billing/submitticket.php